 cleaning
sewing
cleaning
sewingand
mending darning how to knit
quickly and
effortlessly new knitting
yarn from
old knitting
patterns and
needles dealing with
moth
damage men's work
and
activities mending boots
and shoes maintenance
and
decorating

How to knit: what you ought to know before you start
Different countries have developed their own ways of knitting. This page is about the traditional British way.
When starting to learn to knit, it is all too easy to adopt what I call the 'laborious way' of doing it. Because it looks so easy, learners latch onto it and get so used to it that they find it too difficult to change. What is it, you wonder and what is the better way? I will explain shortly, but before I do, I want to list the disadvantages of this laborious way compared with the traditional way which girls (yes, girls) used to be taught in the past. After that you may feel more inclined to learn the traditional way.
The laborious way to knit compared with the traditional way
- Disadvantage: Muscle strain in shoulders and arm because they need to move so much more than with the traditional way. (Yes, it may not happen to you, but I know a number of today's knitters who suffer from it.)
- Disadvantage: Needs constant and concentrated looking down at the knitting whereas with the traditional way, knitters can read, watch television or make eye contact with one another as they knit. Knitting is an automatic process. In fact, in the past, women naturally picked up their knitting as they sat down to relax of an evening.
- Disadvantage: Slower and more labour-intensive than the traditional way.
- Advantage: It looks so easy that anyone can rush into it and start doing it.
What is the 'laborious way' to knit?
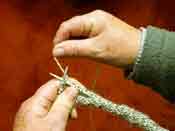
The laborious way to knit involves taking the right-hand off the needle to make each stitch. To do this, the right-hand needle has to be released as shown in the photo, then it has to be picked up again. For every stitch! Consequently every stitch requires eye contact and shoulder and elbow movement. Again, I stress, every stitch! Watching television or reading while knitting is impossible. Even informal chatting is limited because of having to concentrate on the knitting rather than the people around.
It is fair to say that I have seen some excellent work produced the laborious way, but I am sad that the knitters concerned were never taught the traditional way from the outset. They would have found it far, far better in the long run.
What is the traditional way to knit?
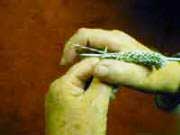
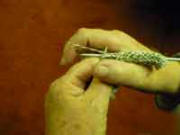
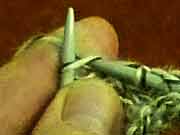
The traditional way to knit keeps the right-hand needle resting between thumb and fingers as shown in the photo, never letting go until the work needs turning round at the end of a row. This is achieved by sliding the hand along the needle and back again for each stitch. After a little practice, the knitting of an entire row is by feel, apart from occasional looking down, leaving the eyes free to look elsewhere and, in particular to look at people while talking to them.
The next section gives more detailed guidance.
How to knit the traditional way
The following photos and their captions explain how to make a stitch and keep the tension constant in the traditional way of knitting. For ease of explanation, they start with a few rows of knitting already completed and with a stitch about to be made mid-row.
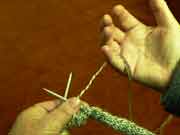
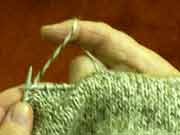
To pick up the yarn, start by linking the little finger of the right hand loosely round the yarn, palm upwards.
Then move the hand, palm downwards, so that the yarn is loosely wound round the little finger and over the first finger (or if you prefer, first and second finger).
Then grasp the right-hand needle between and above the thumb and first (or first and second) finger with the yarn still held loosely so that it can slide easily.
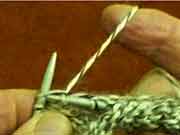
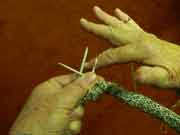
To form the stitch, open the fingers slightly to loosen their grip on the yarn while sliding the hand forward into the back of the stitch on the left-hand needle. Use the forefinger to loop the yarn round the right-hand needle, and slip the loop off, making a new stitch there. At the same time, tighten the grip on the yarn.
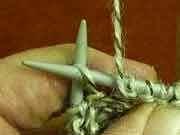
When more rows are on the needles, the right-hand needle is still gripped between the thumb and fingers, but the thumb is under the knitting and holds through the knitting. You can see its lump in the photo.
The tension of the yarn is controlled by how tightly or loosely the fingers are held together as the hand slides along the needle and back again. This will come naturally quite quickly.
Repeat the operation for the next stitch and so on.
At the end of the row, all the knitting will be on the right-hand needle. So now, looking at what you are doing, turn the knitting round so that what was the right-hand needle becomes the left-hand one and continue as before.
This simple stitch is called a stocking stitch, but the procedures for not letting go of the needles mid-row and maintaining tension is valid whatever the type of stitch.
More complex knitting
You will quickly come across what is known as the purl stitch. It is used on alterative rows with the stocking stitch to give a smooth appearance to one side of the knitting.
For the purl stitch, the yarn is held in front of the knitting with the right-hand needle making the new stitch through the front of the left-hand one.
(With stocking stitch, the yarn is held behind the knitting with right-hand needle making the new stitch through the back of the left-hand one.)
More complex stitches are a matter of how the yarn is wound round the needle and how the stitches of the previous row are treated for each new stitch. Knitting patterns which are widely available explain the various effects which can be achieved. Irrespective of the pattern, what matters is that you should still hold the yarn as described and grip the right-hand needle through the knitting, not letting go of it until the end of a row, i.e. continuing to work by feel.
Casting on and casting off
In order to practise what is on this page you need to get some stitches onto the needles. This is called casting on. If you can, get someone else to do this for you at first so that you can go immediately into practising some knitting holding the needles the traditional way.
There are various ways of casting on, depending on the appearance you want, but if you have to get some stitches on the needles yourself, I suggest you use the following simple method: Make a simple loop with the yarn, like a slip knot and put the left-hand needle through it. This is the first stitch. Now make a new stitch from it as described above, but instead of slipping the new stitch onto the right-hand needle, twist it back onto the left-hand needle. This is the second stitch. Repeat to make the third stitch and so on.
When you have cast on the required number of stitches, make a second row by making a new stitch which you slip onto the right-hand needle instead of the left-hand one.
For simple casting off, knit two stitches together to make new stitch. Then knit this loop with the next stitch to make a new loop and continue this way along the row. End with a knot. This should look like a row of chain stitches across the top of the knitting.
Other knitting traditions
A way of knitting similar to crocheting with the yarn over the fingers of the left-hand.
When I was a child in the 1940s, there were immigrants from Europe settled in our area. They knitted even more quickly and easily, and I have wondered why their method didn't catch on widely in UK. The yarn was wound round the left-hand fingers, rather than the right-hand ones, and the right-hand needle dug into stitches on the left-hand needle, rather like crocheting with a crochet hook. This method, too, involved never letting go of the needles between rows and adjusting the tension by how tightly the yarn was wound round the fingers - in this case of the left-hand.
In my experience this Continental way produces a tighter tension, but this may not be so for other knitters.
contributed by Jose Munoz
In the USA we call your 'Continental way' the 'French style' of knitting. It was how my mother taught me to knit.
| sources | webmaster | contact |
Text and images are copyright
If you can add anything to this page or provide a photo, please contact me.

