 shorthand-
typists and
secretaries manual
typewriters carbon
copies the Banda
copier the overhead
projector
(OHP) OHP
transparencies use of OHP
transparencies publishing
before the
digital era preparation of
camera-ready
copy

Manual typewriters and what it was like to use them
This page describes the main features of manual typewriters and explains their purpose. In so doing, it shows why the typing required so much physical effort and mental concentration. The page goes on to illustrate and explain the distinctive appearance of typing produced on these old typewriters, and welcomes improvements with electric and portable typewriters.
____
By the webmaster, based on testing out early manual typewriters and discussions with people who had to use them as a matter of course.
Essential parts of early typewriters and the process of typing
In order to understand why typing with manual typewriters was such hard physical and mental work, you need to know something about their essential parts which made them so different from using a computer keyboard.
Let me explain by taking you through the process of typing a page on a manual typewriter.
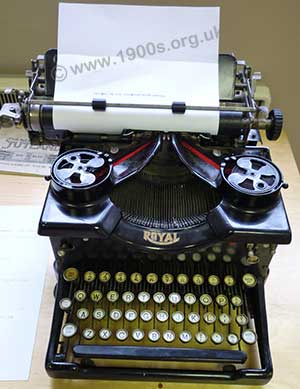
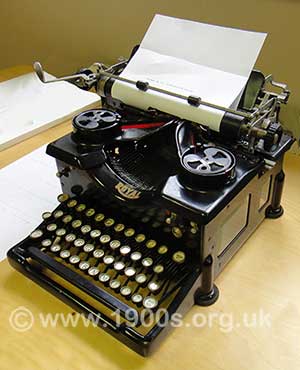
Two views of a vintage manual typewriter
First the typist fed a clean sheet of paper through the typewriter rollers using the rotary knob on the right-hand side of what was called the carriage, so called because it moved along during typing. More of this shortly - but you can see that the photos show it offset from the centre.
She - yes, typists were almost always women - turned the rotary knob to rotate the carriage with its paper to where the typing was to start. As she typed, the carriage moved along taking the paper with it so that the space for the next letter was where the print head would strike.
The carriage had to be reset for the beginning of the next line. So, at the end of each typed line, the typists had to move her left hands away from the keyboard to pull the lever, shown on the left of the second photo. This returned the rollers and paper ready for the next line, and was required as many times as there new were lines on the page.
You can see the need for touch typing which meant that the typist did not look at the keys as she typed or pulled the lever. It was an essential skill for every typist.
Now a few words about the typewriter ribbon.
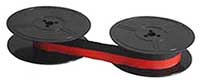
Typewriter ribbon on spools which were slotted onto vintage typewriters
Typewriter ribbon was sold on interchangeable spools. They were normally black, but black and red were also available, normally for use with financial typing where deficits were shown in red. The left and right spools could be interchanged if one half of the ribbon became more worn than the other.
To type, the typist banged down the appropriate typewriter key. 'Bangs' is an appropriate word, because the pressure required was considered normal, although no-one gave it a second thought at the time Nevertheless, considerable force was needed to bring the print head up to the paper to transfer ink from the ribbon onto the paper. The keys, incidentally were flat and round, not shaped to finger tips.
At the end of typing a sheet of paper, she had to use the rotary knob to wind the sheet of paper out of the typewriter and if necessary insert a new sheet.
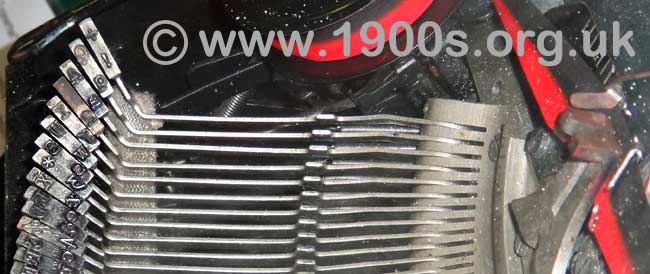
Manual typewriter printheads viewed from above. Note that symbols are inverted left to right so that the imprint on the page is the right way round.
Printheads were integrated into manual typewriters and could not readily be removed. This meant that that any one typewriter could only show one style of font and only at a fixed size. Quite a limitation, although no-one knew any different at the time.
Jammed printheads
Sometimes, if the typing was too fast or more than one key got pressed at the same time, the printheads would lock and need to be disentangled by hand. It was not particularly difficult, but it was an irritating and often dirty interruption to the work.

Printheads jamming together if the typing was too fast
Error correction
Even the best typists made mistakes. The solution was commercial white masking fluids called Snowpake or Tipp-ex fluid. Both came in little bottles which had brushes attached inside their tops. When a top was removed, its brush was ready loaded with the white masking liquid. The bottles had to be screwed down tightly after use. Otherwise the fluid set round the top which prevented the bottle opening again.

Tippex masking fluid
There were also typing rubbers or erasers, but they were not very satisfactory. They had to be hard to remove ink and could all too easily rub through the paper.
The paper had to be removed from the typewriter to correct errors and once they had been erased, it was almost impossible to return the paper so that the new typing would line up with the rest of the line.
Copies
Where a few copies were required, they were normally made at the time of typing not afterwards. This involved the use of carbon paper - see the link for more details. Where more copies were required, there were the Banda and Gestetner machines. There were no photocopiers.
Appearance of text
When typing with a manual typewriter, it was nearly impossible to put the same pressure on every key. So the resulting typing varied in darkness, as can be seen from the part document below. Note also that all the characters occupied the same width, irrespective of whether they were narrow, like 'i' or wide like 'm' and that the letters appear slightly blurred because of the smudging of the typewriter ribbon.
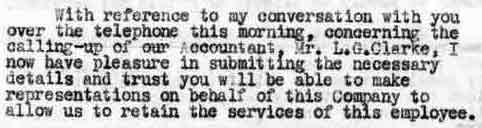
Typing on an old manual typewriter.
Incidentally old documents show the punctuation convention of the time, with more punctuation marks than have become usual in later years. In particular, 'Mr' always had a full stop after it. Being relatively short, the above document does not show the other normal practice of the time of two or three spaces after a full stop. This practice was dropped when justified text (right-hand text aligned as well as left-hand text) became common with the advent of computerised word processors.
Electric typewriters and their improvements
As typewriters improved, they were adapted to run on electricity. They were called electric or electronic typewriters They were more streamlined in appearance and made typing less energy consuming. Portable typewriters also became available in their own fitted carrying cases.
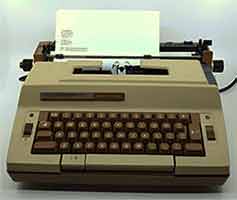
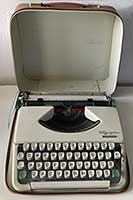
Electric typewriter and portable typewriter
They could take interchangeable modified printheads which allowed for different font styles and sizes. There is more about them on the page about producing elegant pages for publication, called camera-ready copy. There were two types of modified printhead known as golf balls and daisy wheels". Their links give more about them.
Interchangeable printheads were of course an advantage but it was fiddly to replace them every time a new font size or style was needed. Furthermore typing with golf balls was incredibly noisy as the metal balls clanked as they rotated and banged down heavily with every typed character. Daisy wheels were flimsy and chipped easily.
Fortunately neither last long as personal computers soon took over.
Foolscap paper
Today, paper sizes are standardised internationally, but in the heyday of manual typewriters, the standard paper size was called foolscap. It was slightly longer than A4 as can be seen from the following old photo.
Foolscap paper, longer than A4: 13 x 8″ (330 x 203mm in size).
| sources | webmaster | contact |
Text and images are copyright
If you can add anything to this page or provide a photo, please contact me.

