 preserving
fruit preserving
root
vegetables preserving
eggs in
waterglass preserving
eggs in
isinglass pickling eggs
in salt &
vinegar preparing
runner beans
the old way preparing
runner beans
the easier way preserving
runner beans
by salting

Runner beans prepared the easy modern way
Unlike the rest of this website which is about the past, this page is about today. Why? Well, the first pages were the companion in the top menu, where I describe how people in the past prepared runner beans and preserved the crop. As a result, visitors kept contacting me to ask the best way of preparing the beans today. Rather than keeping repeating myself in emails, here is my quick and effective method for stringing and slicing runner beans.
____
By the webmaster, based on years of experience
Fresh home-grown runner beans versus shop-bought
In my view it is not worth bothering with shop-bought runner beans because they are not sufficiently fresh. Whether or not this affects taste is a matter of opinion, but what is important is that they will have become floppy. This makes them impossible to slice by the simple and quick method described below.
It is much better to grow your own runner beans. This is not difficult and produces a large crop over a long period. If you must use shop-bought beans you will almost certainly need to resort to preparing them the old way - which is tedious with poorer results.
Alternatively you could us french beans which are smaller than runner beans, produce a smaller crop and regarded by some people - me included - as having an inferior taste. Some electric food processors do string and slice runner beans, but I have not experience of them as am quite satisfied with the method described below.
Picking runner beans for stringing and slicing
As runner beans string and slice most easily when they are firm, it is best to prepare them immediately they are picked. Provided that the weather is fine, I like to do this while still in the garden, sitting with a bowl for waste between my legs and a bowl for the prepared beans at my side.
I have to pick my runner beans every two days because they develop so quickly, and it is all too easy for them to grow so big that they become too 'stringy'. This is to be avoided because it is embarrassing for the cook and unpleasant for guests who have to chew round 'string' and then remove it to the sides of their plates.
Lumpy runner bean that should be discarded
As runner beans are so prolific, they have an unfortunate habit of hiding amongst their foliage. So inevitably some are missed during picking. When these are spotted later, they are large and lumpy from the enlarged seeds inside. You have to be strong-willed then, and discard them. Not only will they be stringy, they will also not go through the slicing gadget about to be described. Also, if left on the plant, the plant will put its energies into developing the seeds rather than producing more beans.
Preparing runner beans using a specially designed gadget
WARNING
My method of preparing runner beans relies on the gadget shown in the following pictures which should be available from any hardware supplier. I have been emailed to say that some people have tried more sophisticated gadgets to no avail as they block up.
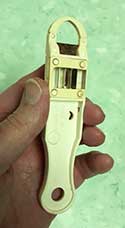
Gadget for stringing and slicing runner beans
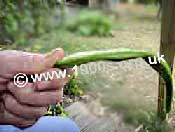
Start by snapping off the tips at both ends of the runner bean, using the thumb and forefinger.

Snapping off an end of a bean with thumb and forefinger - which is quicker than using a knife
This is quicker than using a knife and quicker than using the blade built into the gadget. As already mentioned, I like to have a bowl between my legs to let the waste drop into, with another bowl at the side for the prepared beans.
The next step is to use the gadget for slicing and stringing. I have had mine for years - see the photo. The gadget only needs rinsing under the tap after use to remove the bean juice, and can be left to dry in the air - but do it immediately before the juice dries.
A much smaller version without a handle is also available. I have tried it, but find it too fiddly to hold, and it does not have a facility for removing the 'string' at the sides of beans.
Push the bean through the hole as shown below. The grippers adjust to its size.
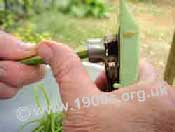
Pushing a runner bean through the slicers of the gadget.
(My gadget is green because I bought it years ago before the white ones were on
sale, and it is still doing the job.)
This is where a floppy bean would disintegrate and clog up the gadget. As the bean goes through, the 'string' along its sides is separated off. I let it drop into the bowl for waste between my legs.
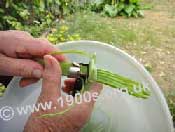
The 'strings' are ejected sideways and should be discarded
Once the beans are halfway through the gadget, I find it quicker and easier to pull the sliced part rather than continuing to push the unsliced part.
The gadget produces slices that are too long for the table. Although they can be cut into shorter pieces with a knife, it is far quicker and easier to take the slices of a bean and 'wring' them, as if they were a wet towel.

'Wringing' long slices of a runner bean to break them into shorter lengths
This breaks the lengths up into short slices which can readily be placed in the other bowl and from there to freezing, cooking or salting.
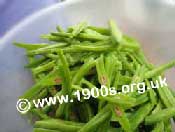
The prepared runner beans ready for cooking, freezing or salting
Freezing runner beans
If you grow your own runner beans, they will produce so many that you couldn't possibly eat them all fresh. I string and slice them as described above and then freeze them in small food bags. I find that one small handful of prepared beans serves one person, but you will want to adjust the number of handfuls per bag depending on the size of your family or the group you need to feed. Runner beans freeze really well. I freeze directly without any further preparation.
There is no need to tie the bags. Just twist or fold the tops and 'sit' the main bulk on top. Then freezing locks them into position so that they don't spill.
Cooking runner beans
It is wonderful in the depths of winter to pull a bag out of the freezer for green vegetables as fresh as the day they were picked. I like to thaw them a few hours in advance in a saucepan of unheated tap water as this gives an even thaw. Then cooking takes 20-25 minutes from boiling.
I have never found microwaving satisfactory for runner beans as it seems to make them tough.
| sources | webmaster | contact |
Text and images are copyright
If you can add anything to this page or provide a photo, please contact me.

