 Victorian
mass housing
estates a typical
house rents
and
incomes house
plans the
kitchen the
kitchen
fire the
scullery the
parlour the
bedrooms the
sash
windows the
front
facade the
backyard
and garden the
outside
lavatory

Sash windows with wooden frames in old houses
____
Extracted from the memoirs of the webmaster's mother (1906-2002) and edited by the webmaster
Few of the Victorian and Edwardian houses still giving good service today still have their original wooden-frame windows. Most have been fitted with replacement UPVC windows designed to look like the originals which were always what were known as 'sash windows'.
My mother's written recollections of life in her childhood in the early 1900s frequently mention sash windows. This set of pages is about what it was like to live with them.
Appearance of sash windows

An original sash window, slightly open with its lower section slid up inside its upper one.
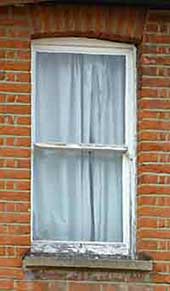
An old sash window. The flaking paintwork on the wooden frames illustrates how the frames needed to be painted regularly to stay in good condition.
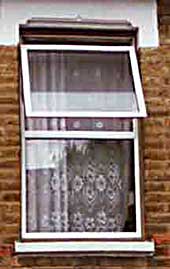
Modern replacement of a sash window with plastic frames preserving the two-section appearance but opening by tilting rather than sliding.
A 'sash window' is a window in two sections which opens by sliding one or both of the sections up or down over the other. Each section is known as a 'sash', and the outer one is the top one.
How sash windows could stay open in any position
Little effort is required to open or close sash windows because of the ingenious system of pulleys and counter balancing weights. This also keeps the sections open in any position.
I understand that sash windows were in use as early as the 17th century, and they were commonplace before the onset of the commercial use of plastics in the middle of the 20th century. In their heyday sash windows always had wooden frames.
Sash window cords
Each window section (ie the upper and the lower sash) is hung on cords which pass over pulleys and connect to weights which are concealed inside the window frame.
Sometimes the sash cords would snap with wear while they were being opened or closed. Then the window would crash down onto fingers. It was very heavy and could hurt a lot.
Sash windows in the better-off houses and public buildings tended to have chains instead of cords. These, of course, snapped much more rarely.
Sash window weights
The weights counterbalance the weight of the window so that it can be raised and lowered with little or no effort and then stays in whatever position it is left in.
Sash window frames
The frames of the sash windows were made of wood. So they expanded in damp weather unless they were painted regularly. The expansion changed the fit, so they often stuck. Then in drier weather the wood contracted and the windows rattled around in the wind.
Sash window horns
There are projections called 'horns' at the lower edges of the upper sash window and similar onesinside on the lower sash section.
These horns prevent the sections from sliding down so far in front or behind that they can't be reached from the other side.
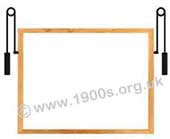
The principle of how sash windows stay in open positions with a system of pulleys and counterbalancing weights. Schematic and not to scale.
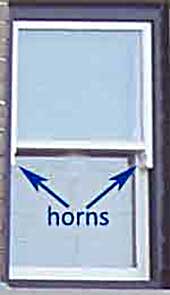
'Horns' on either side of an upper sash window.
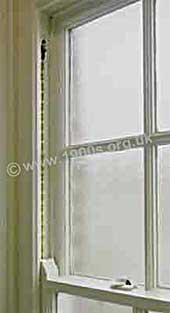
This photo taken from inside, shows a chain, rather than a cord, the sash window locking mechanism and the internal horns on the top of the lower section.
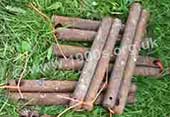
Sash window weights about 30 cm long, tied together in pairs of equal weight, photographed at a car boot sale. They were very heavy!
| sources | webmaster | contact |
Text and images are copyright
If you can add anything to this page or provide a photo, please contact me.

