


 the
thegas threat Government preparation for gas attacks gas masks overview children's and babies' gas masks Government advice on fire precautions ARP
wardens firewatching
and
firefighting the
home guard

Gas masks and masking windows: Public Information Leaflet 2
This page is about the second in the series of public information leaflets issued by the Lord Privy Seal's Office and distributed under the banner of the Civil Defence. It was dated July 1939, even though war was not declared until the following September. This leaflet 'Public Information Leaflet no.2' had two sections entitled 'Your Gas Mask and how to use it' and 'Masking your windows' (better known today as the 'Blackout'). The leaflet consisted of a single sheet of coloured paper folded double, with a two-page spread of information on the inside, continued on the back. This web page reproduces it in full.
____
By the webmaster based on the original document
This leaflet, like the others in the series, gave plans and advice for the anticipated war. No doubt there were numerous amendments as the war occurred and progressed.
Civil Defence Leaflet no 2 - images of the pages
If you would like to read the leaflet as images of the original, tap/click the following images. Alternatively you can read it as text in the coloured box in the next section.
Note the imperial rather than the decimal system of weights and measures. Note, too, the various terms which are no longer readily recognised, but which I just remember from my childhood and which were then commonly available:
Size is any glutinous material used to fill pores in surfaces or stiffen fabrics
Distemper is a forerunner of emulsion paint

Tap/click for larger legible versions
Civil Defence Leaflet no 2 - text of the entire leaflet
This leaflet, like the others in the series, was clearly produced in haste as the punctuation and grammatical distinction between headings and emboldened text is not always clear. In the hope of making it clearer, I have emboldened what I saw as headings and added minimal punctuation marks and links. If you would like to see the text as it was originally, tap/click to enlarge the thumbnails in the previous section.
CIVIL DEFENCE: YOUR GAS MASK, HOW TO KEEP IT AND USE IT;
MASKING YOUR WINDOWS
PUBLIC INFORMATION LEAFLET NO.2
Read this and keep it carefully.
You may need it.
issued from the Lord Privy Seal's Office, July 1939
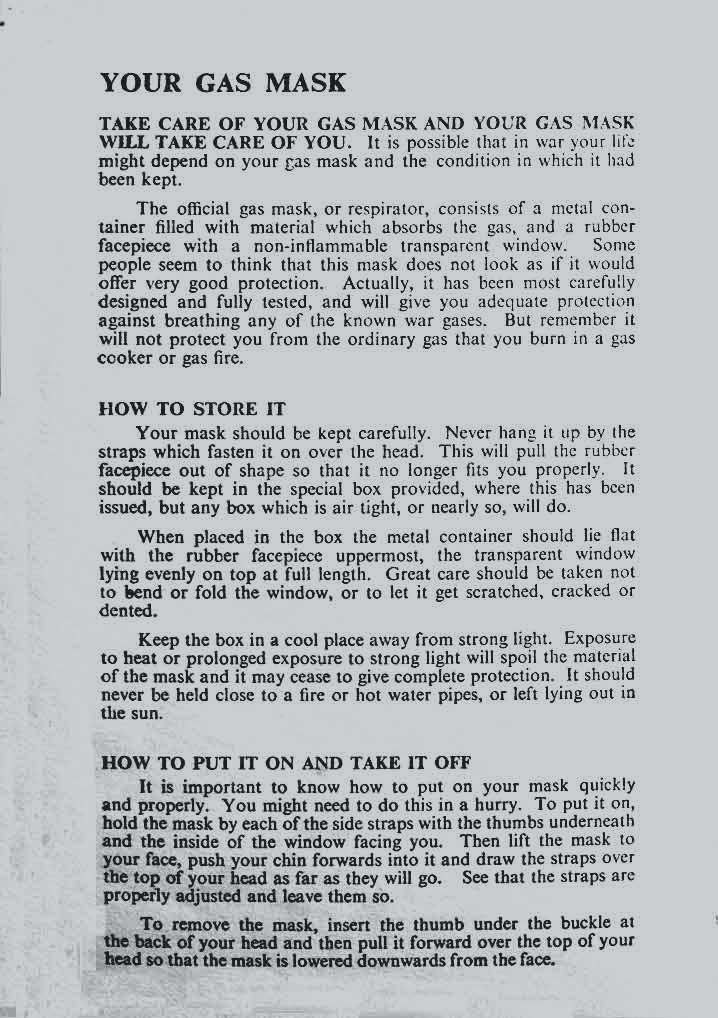
TAKE CARE OF YOUR GAS MASK AND YOUR GAS MASK WILL TAKE CARE OF YOU
It is possible that in war your life might depend on your gas mask and the condition in which it had been kept.
The official gas mask, or respirator, consists of a metal container filled with material which absorbs the gas, and a rubber facepiece with a non-inflammable transparent window. Some people seem to think that this mask does not look as if it would offer very good protection. Actually it has been most carefully designed and fully tested, and will give you adequate protection against breathing any of the known war gases. But remember it will not protect you from the ordinary gas that you burn in a gas cooker or gas fire.
HOW TO STORE IT
Your mask should be kept carefully. Never hand it up by the straps which fasten it on over the head. This will pull the rubber facepiece out of shape so that it no longer fits you properly. It should be kept in the special box provided, where this has been issued, but any box which is air tight, or nearly so, will do.
When placed in the box, the metal container should lie flat with the rubber facepiece uppermost, the transparent window lying evenly on top at full length. Great care should be taken not to bend or fold the window, or to let it get scratched, cracked or dented.
Keep the box in a cool place away from strong light. Exposure to heat or prolonged exposure to strong light will spoil the material of the mask and it may cease to give complete protection. It should never be held close to a fire or hot water pipes, or left lying out in the sun.
HOW TO PUT IT ON AND TAKE IT OFF
It is important to know how to put on your mask quickly and properly. You might need to do this in a hurry. To put it on, hold the mask by each of the side straps with the thumbs underneath and the inside of the window facing you. Then lift the mask to your face, push your chin forwards into it and draw the straps over the top of your head as far as they will go. See that the straps are properly adjusted and leave them so.
To remove the mask, insert the thumb under the buckle at the back of your head and then pull it forward over the top of your head so that the mask is lowered downwards from the face.
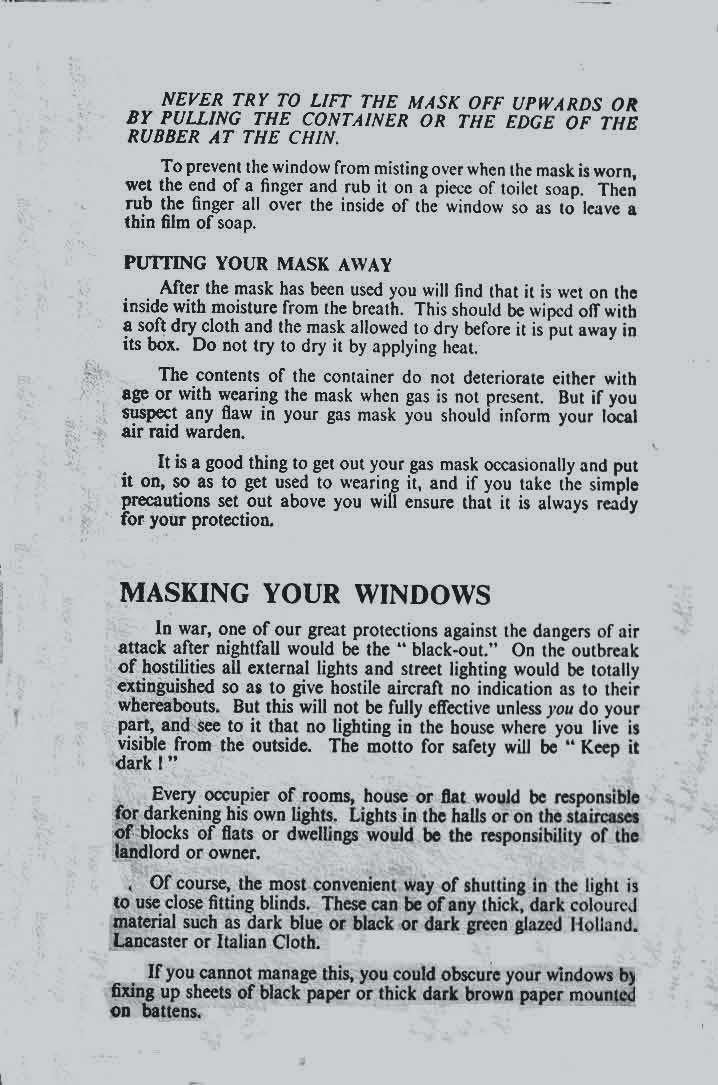
NEVER TRY TO LIFT THE MASK OFF UPWARDS OR BY PULLING THE CONTAINER OR THE EDGE OF THE RUBBER AT THE CHIN.
To prevent the window from misting over when the mask is worn, wet the end of a finger and rub it on a piece of toilet soap. Then rub the finger all over the inside of the window so as to leave a thin film of soap.
PUTTING YOUR MASK AWAY
After the mask has been used you will find that it is wet on the inside with the moisture from the breath. This should be wiped off with a soft dry cloth and the mask allowed to dry before it is put away in its box. Do not try to dry it by applying heat.
The contents of the container do not deteriorate with age or with wearing the mask when gas is not present. But if you suspect any flaw in your gas mask you should inform your local air raid warden.
It is a good think to get out your gas mask occasionally and put it on, so as to get used to wearing it, and if you take the simple precautions set out above you will ensure that it is always ready for your protection.
MASKING YOUR WINDOWS
In war, one of our great protections against the dangers of air attack after nightfall will be the "blackout". On the outbreak of hostilities all external lights and street lighting would be totally extinguished so as to give hostile aircraft no you indication as to their whereabouts. But this will not be fully effective unless you do your part, and see to it that no lighting in the house where you live is visible from the outside. The motto for safety will be 'Keep it dark!'
Every occupier of rooms, house or flat would be responsible for darkening his own lights. Lights in the halls or on the staircases of blocks of flats or dwellings would be the responsibility of the owner.
Of course the most convenient way of shutting in the light is to use close fitting blinds. These can be of any thick, dark coloured material such as dark blue or black or dark green glazed Holland, Lancaster or Italian Cloth.
If you cannot manage this, you could obscure your windows by fixing up sheets of black paper or thick dark brown paper mounted on battens.
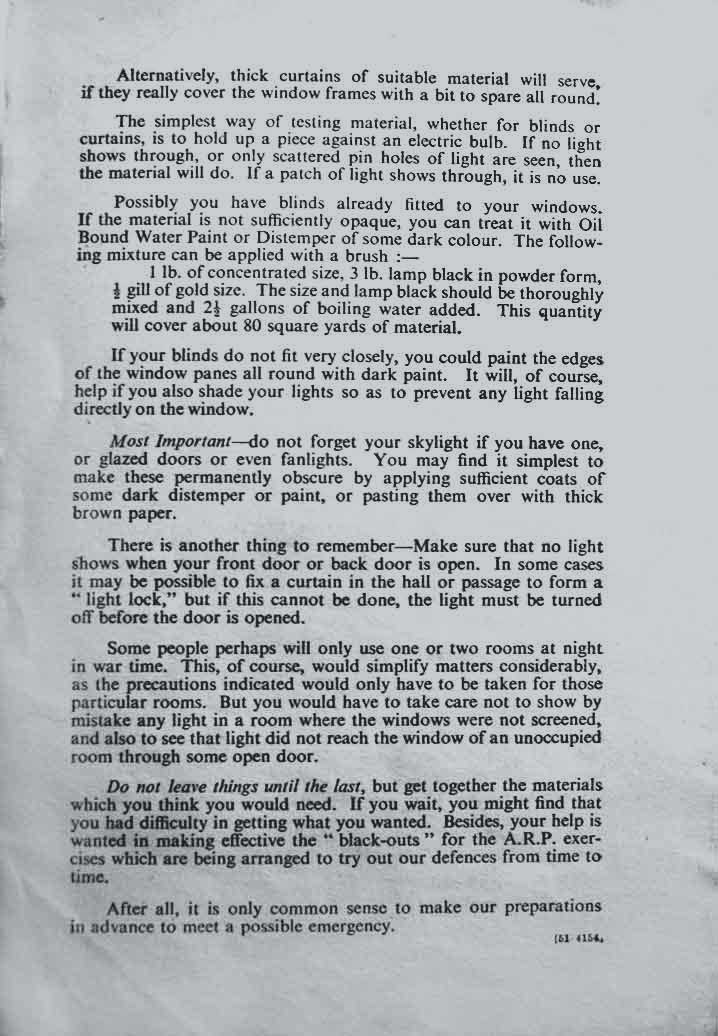
Alternatively, thick curtains of suitable material will serve if they really cover the window frames with a bit to spare all round.
The simplest way of testing material, whether for blinds or curtains, is to hold up a piece against an electric bulb. If no light shows through, or only scattered pin holes of light are seen, then the material will do. If a patch of light shows through, it is no use.
Possibly you have blinds already fitted to your windows. If the material is not sufficiently opaque, you can treat it with Oil Bound Water Paint or Distemper of some dark colour. The following mixture can be applied with a brush:-
1 lb of concentrated size, 3 lb lamp black in powder form, ½ gill of good size. The size and lamp black should be thoroughly mixed and 3½ gallons of boiling water added. This quantity will cover about 80 square yards of material.
If your blinds do not fit very closely, you could paint the edges of the window panes all round with dark paint. It will of course help if you also shade your lights so as to prevent any light falling directly on the window.
Most Important - do not forget your skylight if you have one or glazed doors of even fanlights, You may find it simplest to make these permanently obscure by applying sufficient coats of some dark distemper or paint, or pasting them over with thick brown paper.
There is another thing to remember - Make sure that no light shows when your front door or back door is open. In some cases, it may be possible to fix a curtain in the hall or passage to form a "light lock", but if this cannot be done, the light must be turned off before the door is opened.
Some people perhaps will only use one or two rooms at night in war time. This of course would simplify matters considerably as the precautions indicated would only have to be taken for those particular rooms. But you would have to take care not to show by mistake any light in a room where the windows were not screened, and also to see that light did not reach the window of an unoccupied room through some open door.
Do not leave things until the last, but get together the materials which you think you would need. If you wait, you might find that you had difficulty in getting what you wanted. Besides, your help is wanted in making effective the "black-outs" for the ARP exercises which are being arranged to try out our defences from time to time.
After all, it is only common sense to make our preparations in advance to meet a possible emergency.
[51 - 4154]
The other WW2 Public Information leaflets
There were five Public Information leaflets, all published before war was actually declared. Links are in the relevant pages on the WW2 menus, but for completeness they are also linked here.
Leaflet 1, Leaflet 2 (this page), Leaflet 3, Leaflet 4, Leaflet 5
My thanks to Teresa and Bill Finch for allowing me to use their copies of the Public Information leaflets for this website.
If you can add anything to this page or provide a photo, I would be pleased if you would contact me.
sources: early 20th century material
sources: ww2 home front and other material
contact
the webmaster/author/researcher/editor
privacy policy

